Getting Started
The following documentation will help get you started working on the legacy Geosuite products.
Overview
The server-side portion of the products run on .NET and get deployed via IIS. The client-side portion of the legacy products run on AngularJS. You can review the legacy Geosuite developer docs at http://code
You must be on the VPN to develop/work with the legacy Geosuite products.
There are two legacy servers used for development:
code.tss.tssgis.com- This is the build server (an old Jenkins server) that is used to build the applications
- This server also hosts the documentation (see: http://code)
- This server hosts a custom Nuget package server (used by all server-side product code)
- see
\\code\nuget
- see
- This server also stores all of the build artifacts (including licenses and release builds)
- see
\\code\dist\_latest-releases - see
\\code\dist\_licenses
- see
git.tss.tssgis.com- This is the Bitbucket that hosts all of the old code repositories
Project Setup
Software
- Visual Studio 2019 (server side)
- Visual Studio Code (client side)
First Time Setup
The first time running the products, the following steps must be taken:
Install Node Version Manager (NVM)
- Install NVM for windows
- Install node version 8.17.0
nvm install 8.17.0 - Set the current version of node
nvm use 8.17.0
Setup Proxy to legacy servers
The Transcend "legacy products" rely on the Transcend environment server names. As a result, those names must be proxied by updating your Windows hosts file:
Add host proxy
- Open your hosts file in a text editor (as admin)
C:\Windows\System32\drivers\etc\hosts
- Add the following entries to the end of your hosts file:
- 10.3.81.56 git
- 10.3.81.55 code
Add global packages
- Ensure you are using the correct Node version (listed above)
- Open a PowerShell window (as admin)
- Run the following commands (from powershell):
Set-ExecutionPolicy RemoteSignednpm install -g --production windows-build-tools --vs2015npm install -g bower
Clone Repositories
The legacy products are made up of many repositories (shared and products).
- Navigate to root folder to clone repos (ex:
c:/workspace) - Paste the following:
mkdir products
cd products
git clone http://siteadmin@git/scm/wp/tds.git
git clone http://siteadmin@git/scm/wp/ra.git
git clone http://siteadmin@git/scm/wp/sa.git
git clone http://siteadmin@git/scm/wp/va.git
git clone http://siteadmin@git/scm/wp/ha.git
git clone http://siteadmin@git/scm/wp/re.git
git clone http://siteadmin@git/scm/wp/vlog.git
git clone http://siteadmin@git/scm/wp/jem.git
git clone http://siteadmin@git/scm/wp/plv.git

cd ../
mkdir shared
cd shared
git clone http://siteadmin@git/scm/sp/app.git
git clone http://siteadmin@git/scm/sp/core.git
git clone http://siteadmin@git/scm/sp/data.git
git clone http://siteadmin@git/scm/sp/drawing.git
git clone http://siteadmin@git/scm/sp/grunt-tss-build.git
git clone http://siteadmin@git/scm/sp/gulp-tss-build.git
git clone http://siteadmin@git/scm/sp/io.git
git clone http://siteadmin@git/scm/sp/job.git
git clone http://siteadmin@git/scm/sp/licensing.git
git clone http://siteadmin@git/scm/sp/repo-tss-build.git
git clone http://siteadmin@git/scm/sp/security.git
git clone http://siteadmin@git/scm/sp/spatial.git
git clone http://siteadmin@git/scm/sp/testing.git
git clone http://siteadmin@git/scm/sp/tss-build.git
git clone http://siteadmin@git/scm/sp/tss-build-core.git
git clone http://siteadmin@git/scm/sp/tss-build-py.git
cd ../
Documentation
To view the original documentation for the legacy Geosuite product stack, visit http://code.
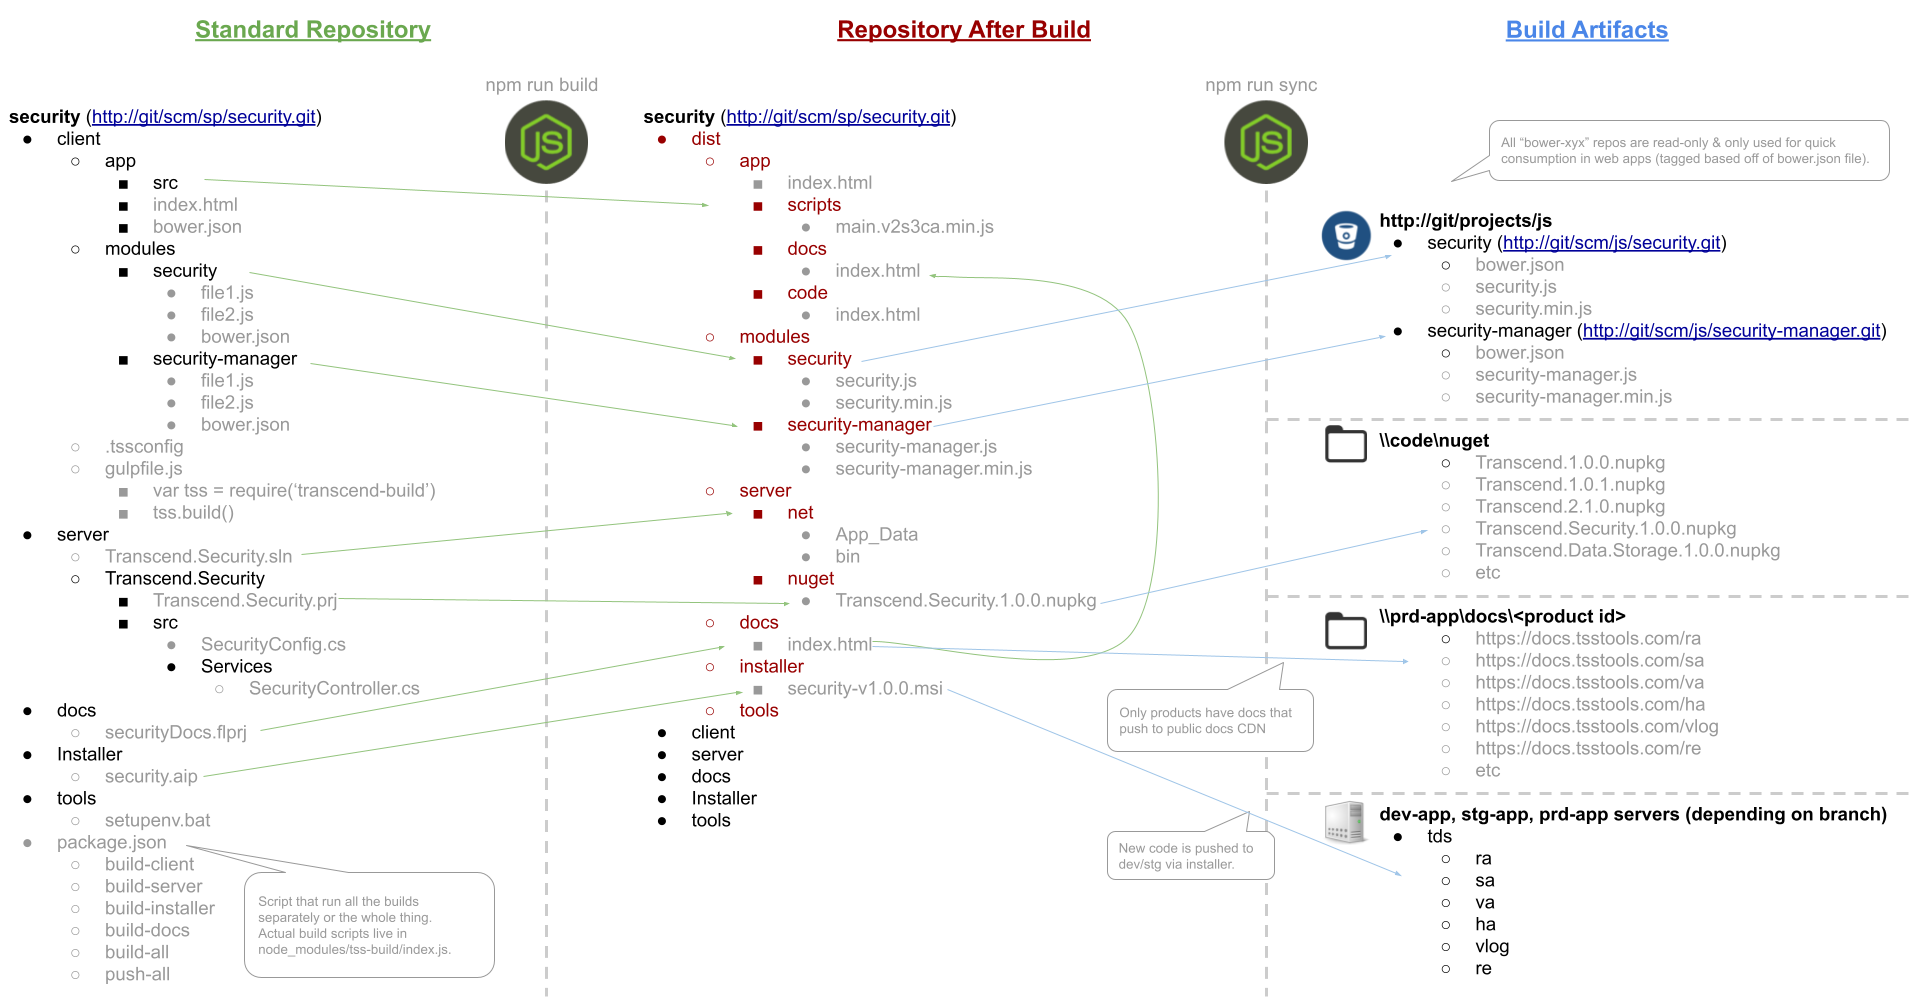
Build Workflow
See details at http://code/docs/#/dev/08_code
Build Server
The Jenkins build server (http://code:8080) has 3 general build types configured:
PROJECT-pr(ex:tds-develop) - this is the build for that repository's Pull Requests- NOTE: This build can not be triggered from Jenkins, in needs to be triggered from Bitbucket by entering a comment of
test this please- which will trigger it to build again
- NOTE: This build can not be triggered from Jenkins, in needs to be triggered from Bitbucket by entering a comment of
PROJECT-develop(ex:tds-develop) - this will build thedevelopbranchPROJECT-master(ex:tds-master) - this will build themasterbranch
Generating Releases
The following steps will walk you through creating a new product release (msi file) for a product. When generating quarterly releases, this process would be followed for every product.
Quarterly releases include new installer versions for every product (whether they have changes or not).
- Checkout
developbranch and pull latest (git pull) - Ensure the version in the root
package.jsonfile for the product is the correct version for the next release.- Check the previous release version in the
\\code\dist\_latest-releasesfolder
- Check the previous release version in the
- If the version is not correct, update it and commit/push your changes to the
developbranch- Releases follow semantic versioning
- Run the release script (from the Rizing monorepo) for each desired project
npm run script -- scripts/git-release-folder.ts "C:/Workspace/products/TARGET_PRODUCT" --overwriteTag=false
If you generate a release build and then need make changes and need to regenerate it (and re-tag it), set the overwriteTag to true
npm run script -- scripts/git-release-folder.ts "C:/Workspace/products/tds" --overwriteTag=true
Troubleshooting
If the build hangs on the installer step:
- Log onto the
code.tss.tssgis.comserver as (TSS\admin.serviceaccount) - Open
Advanced Installersoftware - Click
Help>Registerand walk through the license registration (the key should auto-fill) - Kick off the build again
If a 'develop' or 'master' build fails:
Kick off another build from Jenkins, it can be finicky.
If a PR build fails:
Type test this please in the PR comment and the build server will retry another build
If you can't log into Bitbucket
- Restart
git.tss.tssgis.comserver - Contact Greg Carson and/or Nick Rackus
If an application is missing styles
Sometimes when building the application the build process does not include the CSS. This is a spontaneous (and infrequent) occurrence, but when it does happen, simply re-build it (kick off same build).